Providing proper fall protection is the responsibility of any industrial, manufacturing, or construction company’s owner or safety manager. Having fall protection equipment, like a safety harness, available on-site keeps workers safe and avoids hefty OSHA fines for the company—but in order for them to work, your staff is going to need to know how to use them.
Harnesses and lanyards can be used to both prevent a fall from happening (fall restraint) or can stop a worker mid-fall before they reach a lower level (fall arrest harness). But, not everyone knows how to properly inspect and wear a safety harness. Wearing a faulty fall protection harness can be just as dangerous as not using any protection at all. Whether you are new to the field or a seasoned pro, it’s worth taking a moment to review—and share—these tips on inspecting and adjusting your safety harness before you begin your next job.
How to Inspect a Harness
Before you wear a fall protection harness, you need to inspect the components to make certain the equipment is in good working condition. Giving the harness a shake-down not only gives you a closer look at the condition of the components, but can also help you to get acquainted with all the straps, loops, D-rings, and fasteners that you’ll soon need to configure in order to wear the harness.
Hold the harness by the D-ring found at the back. Shake it gently to let all the straps hang down loosely. Unfasten any buckles. Now, take a close look at the webbing for any loose or frayed stitching, worn or damaged fabric, and foreign objects adhered to the fabric. Next, closely examine the metal D-ring and other fasteners for any deformities and cracks. Grommets should be securely inserted into the webbing, unable to wiggle and should not be bent. If you are uncertain about the equipment’s condition, do not wear the harness. We recommend all safety harness users acquaint themselves with OSHA’s Personal Fall Protection Regulations and ensure their own systems are compliant with these standards before each and every use.
If the harness or any of the system’s components have been subjected to impact loading, do not wear it. The equipment should be immediately removed from service and not used again until it has been evaluated by a competent person to determine the equipment is safe for use.
How to Put on a Harness
OK, so you’ve inspected your harness and it’s good to go. Now it’s time to put it on.
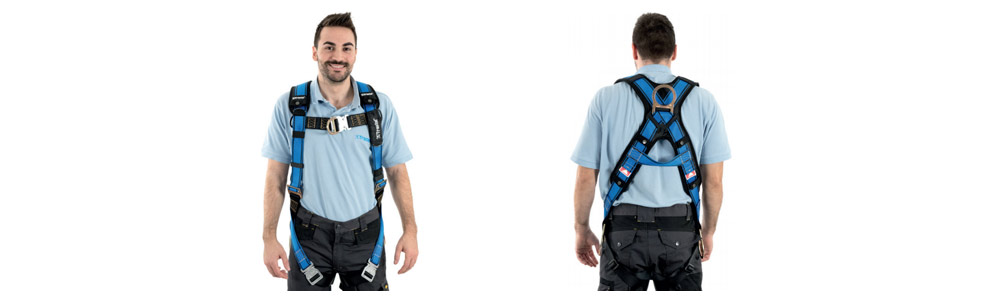
1. First, slip your arms through the arm loops and pull the harness around the back of your shoulders as if you are putting on a jacket. The dorsal D-ring should be positioned at your back, resting comfortably between your shoulder blades. If you can’t feel it yourself, have a coworker check for you.
2. Next, connect the leg straps and adjust, making sure they are securely fitted.
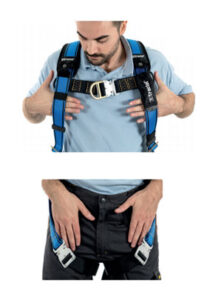
3. Then, connect the chest strap and adjust so it is positioned across the chest.
4. Adjust shoulder straps, and sub-pelvic straps so they are under the pelvis. The harness should be snug but not overly tight.
5. Finally, secure all loose ends of the webbing using the elastic keepers. The harness must allow for movements and positions without significant constraints of the body.
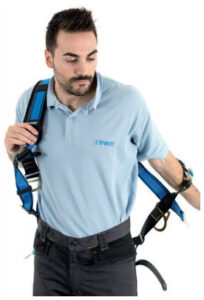
A Note on Fastening the Harness
Your fall protection harness could be equipped with several types of buckles, depending on the manufacturer and type of harness. If you do not know how to fasten the buckles on your harness, ask your supervisor or a competent person, or the manufacturer to walk you through it.
Types of Fasteners:
- Tongue Buckle: A tongue buckle works like a belt. Simply slip the webbing’s loose end through the buckle and fasten it by connecting the buckle’s tongue through a grommet.
- Pass-Through Buckle: Comprised of two metal frames, one slightly larger than the other, the pass-through buckle is fastened by passing the male end (adjustable) through the female end (stitched to webbing) and pulling the buckle taut.
- Parachute Buckle: The parachute style buckle is a single metal frame equipped with a knurled bar and slider. Pass the loose end of webbing up through the buckle frame, over the knurled bar, and down to push out under the frame to fasten. Pull the loose end of the webbing taut. A minimum of three (3) inches of webbing must extend past the fastened parachute buckle.
- Quick Connect Buckle: The male end of a quick connect buckle is a metal tongue with flange and the female end (adjustable) is a receptor. Simply insert the male end into the female end and you will hear a confirming “click” when the buckle is correctly fastened, much like a seat belt.
Adjusting the Harness
 If you are wearing loose-fitting clothes, tuck any excess clothing (shirt-tails, hoods, drawstrings) and button or zip up any open clothing. Check that your belt is fastened and the loose end is fitted into the strap retainer. If you have bulging items in the pockets of your shirt or pants, remove these items while working at height and store items in a secure location. Check that your shoes are tied. You won’t want to lose valuables or have any loose clothing or items interfere with the function of the fall arrest harness should you accidentally fall.
Fasten your harness, then adjust it to fit your body. Stand upright with your muscles relaxed. There should not be any slack in the safety harness’ chest strap, shoulder straps, or leg straps. Tighten or loosen the webbing through the harness’ buckles to get a snug fit. The safety harness should not hinder your range of motion.
Check the adjustment of each leg strap by placing your hand flat and sliding your fingers beneath the strap. Your fingers should fit snugly between the strap and your leg. You should not have to force your fingers to fit beneath the leg straps.
Make sure any loose webbing ends are secured into the strap retainers on the harness. No loose ends should be hanging freely after your fall protection harness has been properly adjusted.
Stay Smart When it Comes to Fall Protection
Most equipment manufacturers provide written instructions or instructional videos to teach you how to inspect, use, and maintain fall arrest harnesses and lanyards. Take a moment to review the manufacturer’s recommendations.
The equipment manufacturer should also provide documentation to confirm that fall protection harnesses and lanyards meet OSHA regulations and ASNI standards. Harnesses and lanyards that are approved by OSHA and ASNI have undergone rigorous testing to ensure your safety.
If you have additional questions or would like to learn more, partnering with a reputable safety equipment manufacturer can be an invaluable resource. The team here at Fabenco is well-versed in OSHA policy and fall safety and are available to answer any inspection or usage questions you might have. Remember, OSHA requires that employers provide fall prevention training to any employee who might encounter fall hazards. Hands-on training is the best way to learn how to identify potential fall hazards and put the right equipment to use at your worksite in order to prevent falls. To make sure your employees stay safe, healthy, and productive, begin by teaming up with a trusted partner like Fabenco.
Related Posts